How to Set Up and Use Driver Files
For each applicant or new hire, CDLSuite gives you the ability to create a driver/employee file with Driver Files.* There are three main steps for using Driver Files effectively: You must Create a file, add a driver, and import any Hires (existing employees).
Driver Files Initial Setup
The Hires Tab
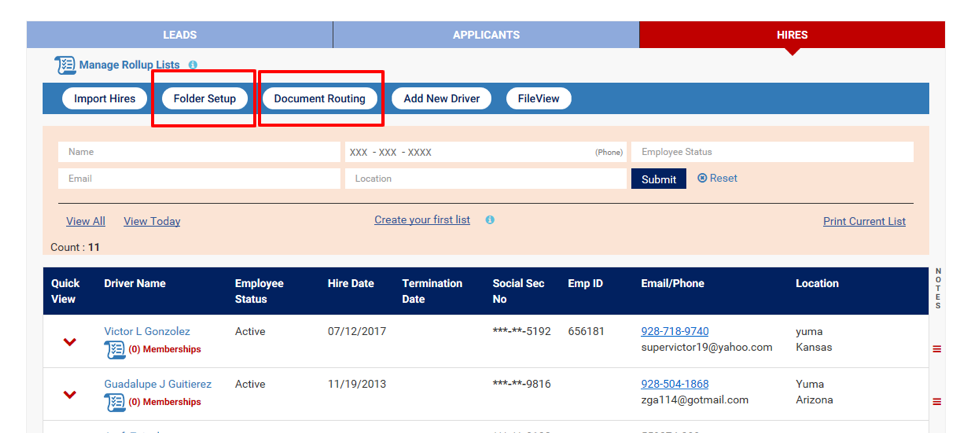
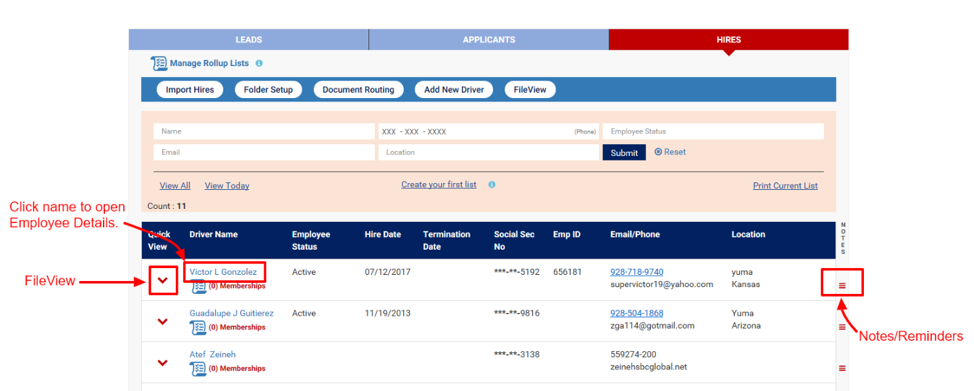
The Hires tab shows a listing of all the drivers/employees that the system is monitoring.
The Driver Files module is found within the Hires tab. To access this tab, from your Profile Home page, click on “View Leads/Applicants/Hires”, which will take you to the “View Applicants” page.
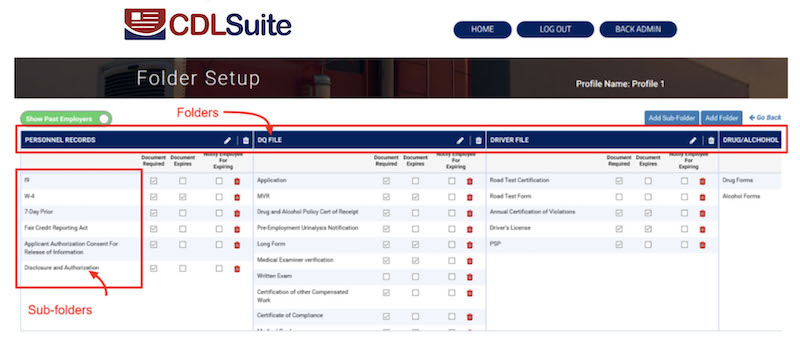
Sub-folders
Click the “Add Sub-Folder” button. Choose the folder that you want the folder stored/routed to. Name the sub-folder. Click Save. You will then need to indicate whether the documents are Required, will Expire, and whether the employee should be notified of expiration.
Driver Files uses sub-folders to monitor the status of individual documents. While you can put more than one document into a sub-folder, it is recommended to create a sub-folder for each document that you plan to maintain. When multiple documents are stored in a sub-folder the system will monitor the top-most document in the folder. Once created, you can rearrange the order of the sub-folders by dragging them into the desired order, within the sub-folder or between different sub-folders. Sub-folders will be displayed in that order on the live page. You can rearrange the order of sub-folders as often as you like.
Note: It is recommended that sub-folders be given names that match the document or form that will be kept in them.
Folder Setup
Prior to creating your first driver file you will need to set up your desired file folders using the Folder Setup tool. You will need to ensure that all the electronic documents you currently use are routed into the file folders that you choose. These two steps are easily accomplished using the Folder Setup tool and the Document Routing tool. Each step takes only a few minutes and will only need to be completed once, with minor adjustments to accommodate future changes in your internal processes.
Note: It is recommended to choose electronic file folders that match your current paper file system.
CDLSuite provides default folders and sub-folders upon establishing your account. You can utilize the defaults or change them entirely, as often as you like, to resemble your current file system. You can add or delete folders and sub-folders and drag/drop them to change the order that they appear in on the live page.
Folders cannot be deleted unless they are empty of all sub-folders. Sub-folders cannot be deleted unless they are empty of all documents.
Folders
Folders represent the tabs in your new file system.
Click the “Add Folder” button. Name the folder, keeping it similar to the sub-folders it will contain. For example, you can create a folder for all your general HR documents and call it “General HR”. Click Save. Once created, you can rearrange the order of the folders by dragging them into the desired order from left to right. Folders will be displayed on the live page in the order that you choose on the Folder Setup page. You can rearrange the order of folders as often as you like.
Past Employers
Driver Files uses a default Folder for the management of past employers. As an alternative to using the default, you can create your own Folders and Sub-folders. If you do choose this option, you can hide the default tab by using the switch in the upper left corner of the Folder Setup page.
Document Routing
Note: If you do not utilize the CDLSuite electronic application, you do not need to set up document routing. However, you will need to manually upload each document that you want the system to monitor, and place it in the appropriate Sub-folder.
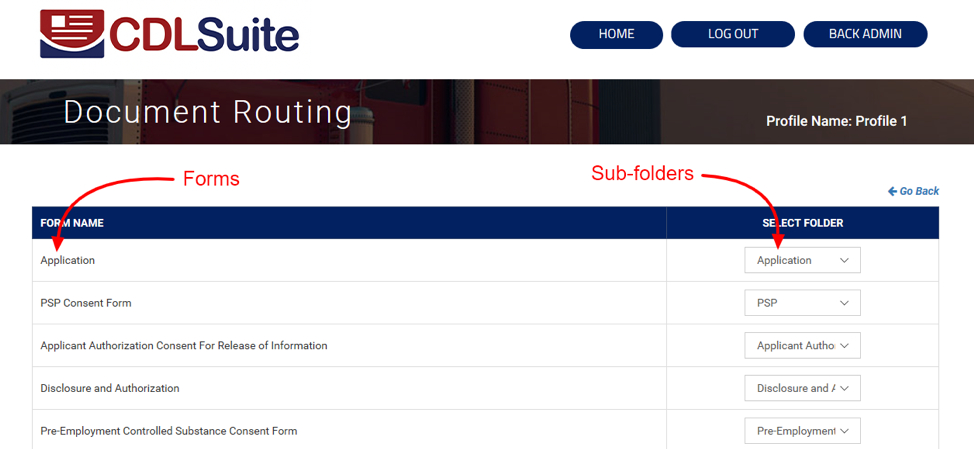
After you have created the Folders and Sub-folders that you plan to use, Document Routing (or mapping) allows you to route your electronic documents to the desired Sub-folders. It is recommended that you have a Sub-folder for the driver’s application, each of the standard consent forms, and each of the custom forms that you utilize.
From your Profile Home page, choose “View Leads/Applicants/Hires”. On the “View Applicants” page, under the Hires tab, click on Document Routing. In the left column of the Document Routing page you will see a list of the electronic forms that you are currently using. This list includes the Job Application, all standard consent forms that you activated on the account setup page, and any custom forms that you created with the Custom Forms tool. Note that any forms that remain un-activated will not show up in this list.
On the right side of the page you will see a listing of all the Sub-folders that are active, including the ones you created. Use this page to map the electronic documents on the left to the Sub-folders on the right. This page tells the system where to send each of these documents whenever an individual driver file is activated.
Document routing can be updated as needed to accommodate changes in your internal processes. Each time you activate an additional standard form or custom form you will need to update the document routing list so that the system will know where to place the newly activated document.
Employee Details
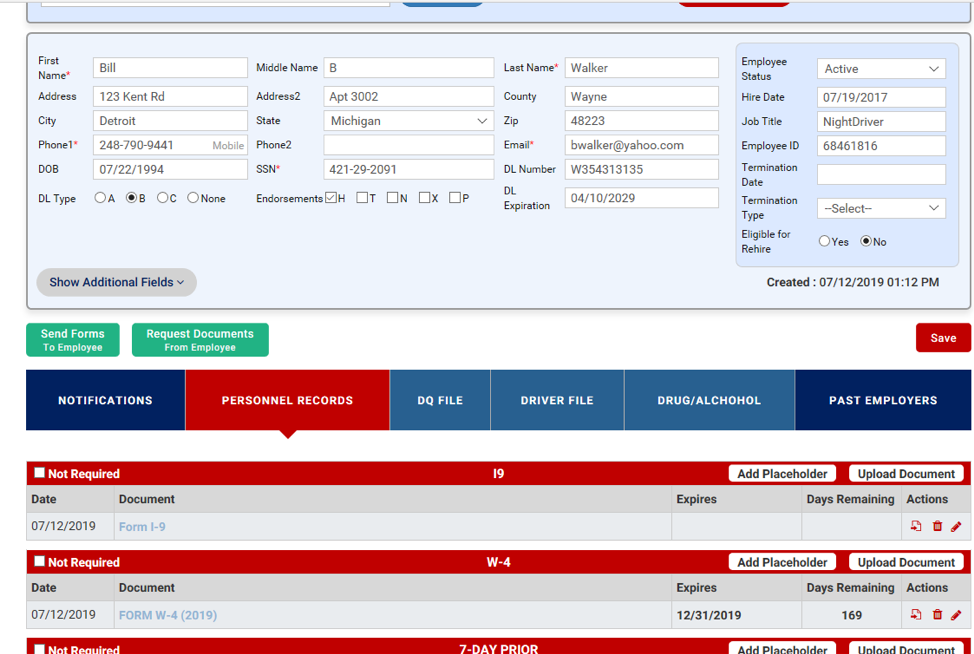
The Employee Details page allows you to edit your employee’s personal information, add or view notes and reminders, and manage the driver’s file. Use the green send and request buttons to send additional forms to the driver and to request that the driver upload needed documents. You are also able to control the employment status of the driver from this page, including Termination. Additional fields can be added to the Employee Details page by clicking Custom Questions on the Profile Home page of the account.
Notifications
The Notifications page shows the documents that have been uploaded by the driver (Inbox), the documents that are due to expire (Expirations), and the documents that are missing (Missing). Missing documents are determined based on the information in the sub-folders that you created, representing your documents and marked as “Required”.
Past Employers
The default Past Employers page allows you to see and manage each past employer’s documents. It also allows you to record each attempt to collect require past employer forms.
Tabs to the right of the Notifications tab (with exception of the system Past Employers tab) represent the folders that you created. Clicking on any of these tabs will display the sub-folders you created.
Import Hires
As an alternative to entering your employee files manually, you can use this function to upload employees in batches. Simply add your files to a CSV file (you can save an Excel file as a CSV file). Each record must include a value for First Name, Last Name, Phone1, Email, and SSN required fields). For each file imported, you will need to begin uploading the documents to the applicable Sub-folders.
Under the Hires tab on the View Applicants page, click the "Import Hires" button. In the "Upload CSV" box, click "Browse" to locate the file containing your employees. Select the appropriate CSV file then map your fields by clicking "Proceed”. A page with two columns will appear. On the left is a list of the fields in your CSV. The right column contains a series of dropdown fields. These dropdowns list the fields that are required as part of your upload. For each field in the left column, click the adjacent field in the right column, which is where your value will be stored. For example, for a field named "Cell Number" in the left column, choose "Phone1" in the adjacent field. You don't have to match all fields. For example, if you have extra columns in the table for items like "Age", you do not have to choose a target field for that column. Once you have mapped all needed columns click "Save" at the bottom of the page.
Add New Driver
This button is for new fleets that utilize Driver Files without the CDLSuite electronic job application. Click on the Add New Driver button to manually add the details of the driver. For each file added, you will need to upload the appropriate file documents to the applicable Sub-folders. You can return at any time to add additional info. When finished, click “Save”.
FileView
For a quick review of the status of all the documents in a singe driver’s file click the FileView button. FileView allows you to quickly confirm which documents are missing, due to expire, or current.
Notes
Use the Notes icon (three red bars) on the right end of the desired employee record to view and add notes and reminders to the driver’s file. Click the driver’s name to access the full file (Employee Details).
*Note: For pricing on the use of Driver Files, click on Manage Billing from your Profile Home page.
