How to Use Document Routing
Document Routing is a CDLSuite option to automatically direct, place and monitor your employee files in one location.* This feature can be accessed under the Hires tab from your Profile Home Page.
*Note: If you do not utilize the CDLSuite electronic application, you do not need to set up Document Routing. You will, instead, manually upload each document that you want the system to monitor and place it in the appropriate Sub-folder.

From your Profile Home Page, choose View Leads/Applicants/Hires, which will take you to the View Applicants page. Click on the Hires tab.
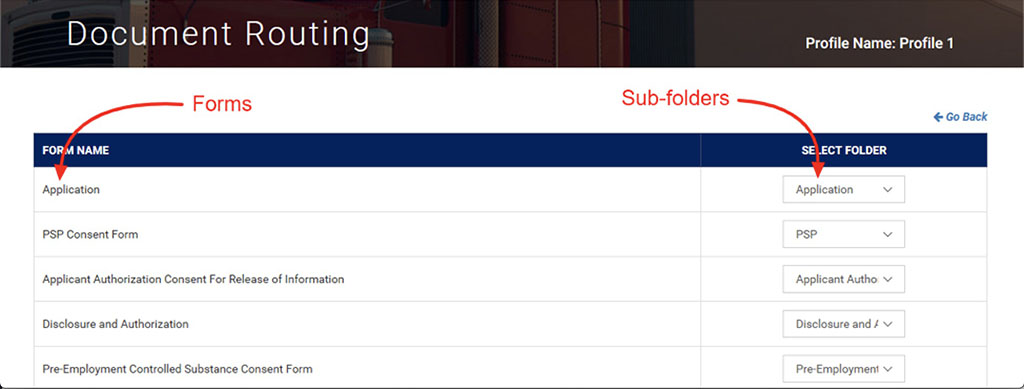
From the Hires tab, click the Document Routing button. In the left column of the Document Routing page, Forms, you will see the list of electronic documents you are currently using. This list includes the job application, all standard consent forms that you activated during account setup, and any custom forms that you activated in the Custom Forms tool. Note that any forms you have not yet activated will not show on this list.
On the right side of the page you will Select a Folder. This is where you will route your electronic documents on the left to the Sub-folders on the right. This feature tells the system where to send each of these documents whenever an individual driver file is activated. You can choose from a list of standard Sub-folders, as well as the ones you created.
After you have created the Folders and Sub-folders that you plan to use, you will need to route your electronic documents to the desired Sub-folders. It is recommended that you have a Sub-folder for the driver’s application, each of the standard consent forms, and each of the custom forms that you utilize.
Document routing can be updated as needed to accommodate changes in your internal processes. Each time you activate an additional standard form or custom form you will need to update the document routing list so that the system will know where to place the newly activated document.
